Test ran Crescent Rose for one day at Otakon 2015. Gained valuable feedback that is listed below.
Problems:
-The pneumatic system ended up being leaky. Seems like my previous tests were only good for stopping major leaks. The tests did not catch the minor leaks and this ended up bleeding out any air in the system after a recharge. Thus the transformation did not happen as often as I would have liked.
-The foam board part of the claw attached to the 2 wire Vex motor was not as strong as I had thought. I did sort of expect this one as I had a hunch that there would be issues here.
-The 3 wire Vex motor is very specific with moving. There would be times where the Vex motor would move just as expected and some times where it won't budge at all. Still not positive of the exact cause but it seems to be a combination of weak motors, and the motor not clutching the metal rod successfully.
-Weight. This was sort of expected, making things move also tends to make them heavier.
Good things:
-The pneumatics were an absolute beast when they had the air to work. Extremely reliable when they did move and the gun part of the prop had almost no damage besides some minor foam board peeling.
-The 2-wire Vex motor worked beyond what I had expected. It moved 100% when I needed it to and was strong enough that it probably aided in the foam board degradation where it was attached to in the claw.
Future possible improvements:
-Change material of the claw
As expected most of my problems came from the claw. Future improvements would be to change the material of the claw to something more solid. Plastic is most likely a probable replacement. Weight might be an issue.
-Replace the 3-wire Vex motor with a 2-wire Vex motor.
This would improve reliability of the second section of the claw by simplify the controls as a micro controlled would not be needed in that case. This would also give it more strength. Only issue is that it weights more than the 3-wire and gearing might have to be tweaked.
- Fix the leaks
The leaks have defiantly caused a problem and I have a good idea on where it might be. Most air issues are where the brass fittings are. Need to tighten them and see if that fixes it.
-Find a better air source.
Would be really convenient to have a better compressor so that air is available all the time. This would also fix the leaks problem as a compressor that runs on battery would have air all the time. Leaky system? Just add more air!
Crescent Rose Fix #1
Engineering Functional Cosplay Props.
Friday, July 24, 2015
Thursday, July 23, 2015
Crescent Rose Prototype Build Write Up part 3
Time for integration!
As in attach the claw to the gun.
Right off the bat, I realized I made a procedure error. I had built the gun and claw separately. What should have been done is creating the gun and building the claw off of that base for a fluid integration. Well, there's nothing I can do about that now so I proceeded forward. The pieces to be connected was the Rod Clevis of the Pneumatic cylinder to the Vex Metal Chassis. Basically, attach this

to this
 Plans were below:

I made the connecting piece out of foam board because I did not have anything else and was running out of time. I then used hot glue and wrapped duct tape to secure the hold. One thing I did not put into account was the swivel of the claw attached to the cylinder. The weight of the claw ended up turning the claw this way and that and I had to figure out a way to secure the claw better and something that would not impede the linear movement of the pneumatic cylinder.
The answer was server rack slides. This would allow the claw to stay stable and be able to move along with the linear movement.

I was lucky enough to be able to retrieve one from a pile of mostly electronic junk that a company was throwing away. I measured the needed length, cut it with a borrowed hacksaw and attached it to Crescent Rose with hot glue and duct tape. Below, you can see the attached slider.
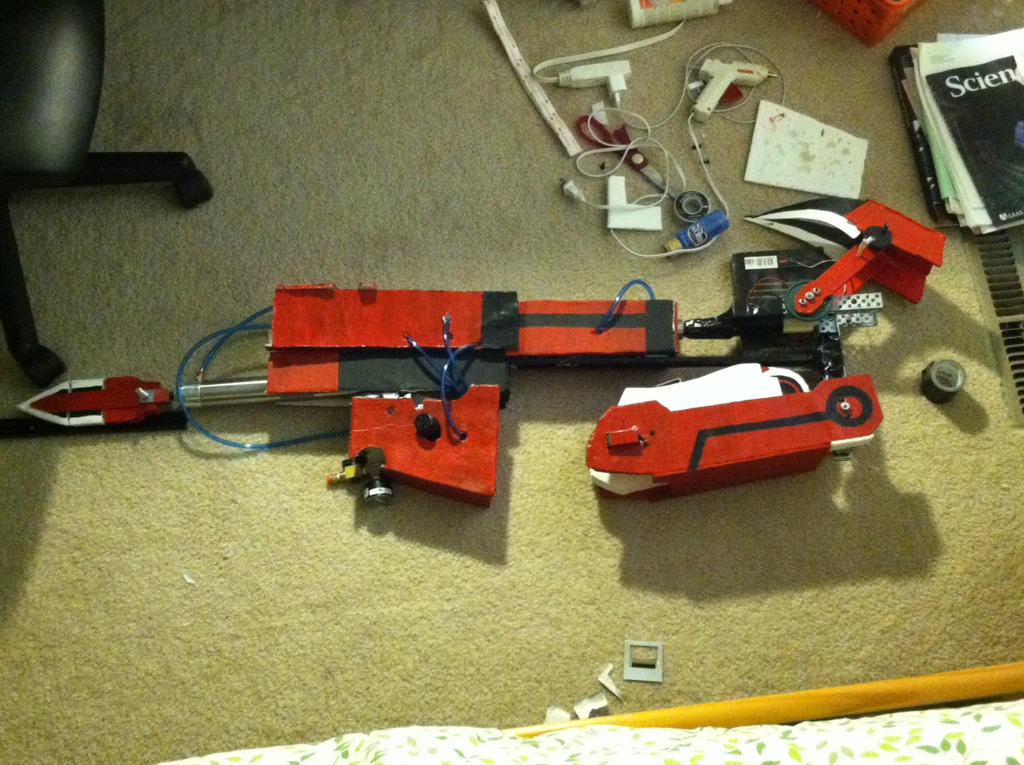
With that solved, the last thing to do was attach the micro controller and voltage source to Crescent Rose. Unfortunately, there wasn't any space left in the magazine clip part of the gun so I had to mount it on top of the gun outside. Due to time limits, the wires were also hastily tossed on top. Final result is below.

With everything looking good, I gave it a test run.
Works well but we'll see how it deals with a full day of use at Otakon 2015.
Otakon 2015 Result Post
As in attach the claw to the gun.
Right off the bat, I realized I made a procedure error. I had built the gun and claw separately. What should have been done is creating the gun and building the claw off of that base for a fluid integration. Well, there's nothing I can do about that now so I proceeded forward. The pieces to be connected was the Rod Clevis of the Pneumatic cylinder to the Vex Metal Chassis. Basically, attach this
to this
I made the connecting piece out of foam board because I did not have anything else and was running out of time. I then used hot glue and wrapped duct tape to secure the hold. One thing I did not put into account was the swivel of the claw attached to the cylinder. The weight of the claw ended up turning the claw this way and that and I had to figure out a way to secure the claw better and something that would not impede the linear movement of the pneumatic cylinder.
The answer was server rack slides. This would allow the claw to stay stable and be able to move along with the linear movement.
I was lucky enough to be able to retrieve one from a pile of mostly electronic junk that a company was throwing away. I measured the needed length, cut it with a borrowed hacksaw and attached it to Crescent Rose with hot glue and duct tape. Below, you can see the attached slider.
With that solved, the last thing to do was attach the micro controller and voltage source to Crescent Rose. Unfortunately, there wasn't any space left in the magazine clip part of the gun so I had to mount it on top of the gun outside. Due to time limits, the wires were also hastily tossed on top. Final result is below.
With everything looking good, I gave it a test run.
Works well but we'll see how it deals with a full day of use at Otakon 2015.
Otakon 2015 Result Post
Crescent Rose Prototype Build Write Up Part 2
Next is to build the claw.
Luckily I had stuff leftover from middle school that I could use.
I had an old Vex starter kit that had been bought for robotics summer camp.

I also had an old Boe-Bot Kit that was also bought for another year of robotics summer camp.
 The claw was pretty simple for me to figure out. A sketch is below.

The plan was to have two 3-wire Vex motors to power the claw. One would be power the first segment, the other would power the second. The first one would be geared so that it would better handle the weight of the claw, the second would be attached directly. I did not do the last segment because it was too small to warrant a motor. Foam board was the main material for the claw because it had well enough strength for its weight. The patterns for the claw shapes were the free ones from Tatsutetsu. Thanks man!
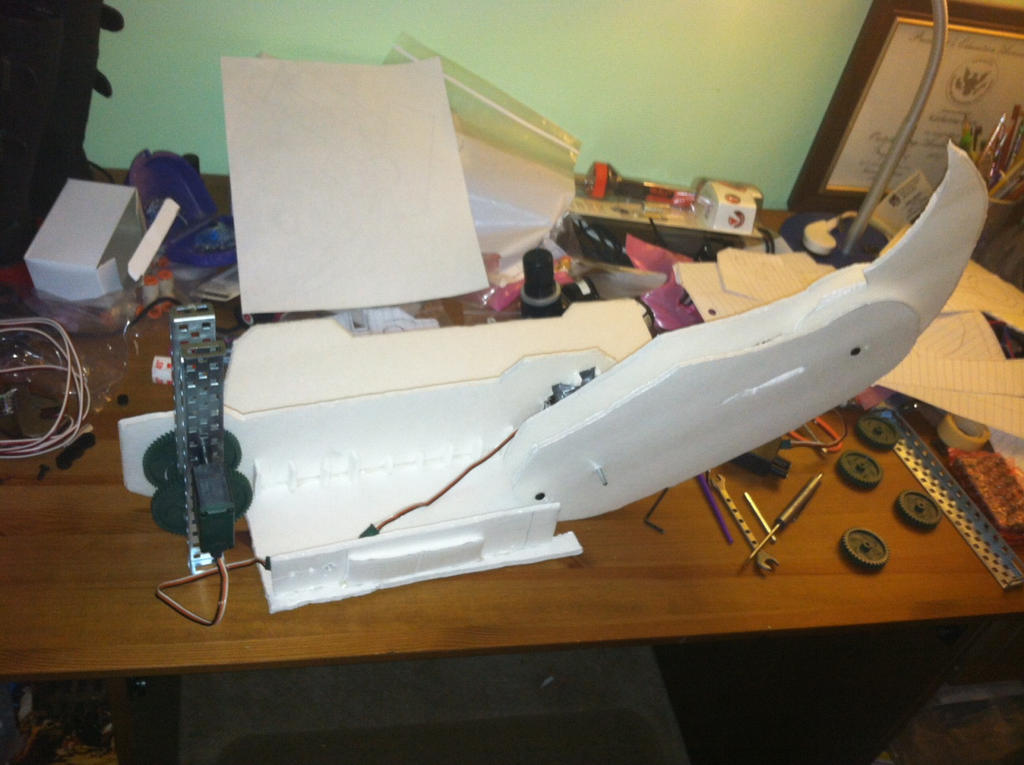
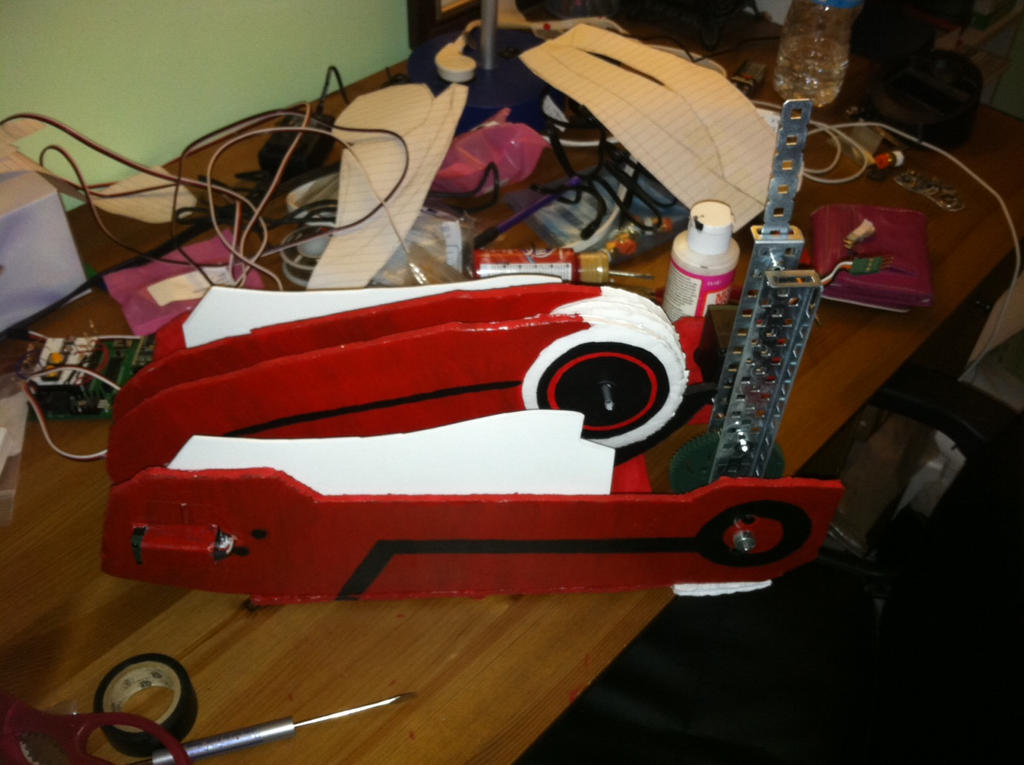
At first I tried keeping the last talon like part solid, but it won't fold so I decided to keep it free hanging so that I could fold it. The Vex motors were attached via nuts, hex screws and hot glue. The first Vex motor was also geared toward torque using Vex gears with a ratio of 36:60 or 1.6. The Vex motor ended up not being able to hold the weight at that setup and sagged so the ratio was changed to 12:60 or 5. At this setup it did not sag anymore but having the Vex 3-wire motor move under this setup caused it to click and stagger. This is not good behavior for a motor or a servo so it was removed and replaced with a stronger Vex 2-wire motor as I did not have any smaller count toothed gear or any bigger count toothed gear. It worked like a charm nonetheless! The second servo was able to lift its load well so it was not touched at all. The claw was then painted.
The controls for the set was the Parallax micro controller and a 7.2V source. The 3 wire Vex motor had to be controlled from the micro controller and the 2 wire Vex motor was be controlled by a 7.2V source and a Double Pole Double Throw switch. The schematic for the 2-wire Vex motor control is shown below.
The three wire motor was controlled from a the Parallax Board of Education micro controller. This micro controller also has a its own breadboard attached. I decided to use push buttons as it would be the easiest way for me control the 3 wire motor. The setup on the board is below:

The Board of Education micro controller is programmed in there own version of Basic: Basic Stamp. The code is below.
' {$STAMP BS2}
' {$PBASIC 2.5}
Main:
DO
IF (IN3 = 1) THEN
PULSOUT 13, 450 'counter cwise
PAUSE 50
ENDIF
IF (IN4 = 1) THEN 'clockwise
PULSOUT 13, 1010
PAUSE 50
ENDIF
IF (IN9 = 1) THEN 'counter cwise
PULSOUT 12, 500 '500 previous value
PAUSE 50
ENDI
IF (IN10 = 1) THEN 'clockwise
PULSOUT 12, 1010 '1010 previous value
PAUSE 50
ENDIF
LOOP
So to move forward, you press one push button. To go in reverse, you push the other.
After running the motors through their movements, they work well but do not have the solid strength and reliability of the pneumatics. If there are going to be troubles, then it will be with the claw.
part3
Luckily I had stuff leftover from middle school that I could use.
I had an old Vex starter kit that had been bought for robotics summer camp.
I also had an old Boe-Bot Kit that was also bought for another year of robotics summer camp.
The plan was to have two 3-wire Vex motors to power the claw. One would be power the first segment, the other would power the second. The first one would be geared so that it would better handle the weight of the claw, the second would be attached directly. I did not do the last segment because it was too small to warrant a motor. Foam board was the main material for the claw because it had well enough strength for its weight. The patterns for the claw shapes were the free ones from Tatsutetsu. Thanks man!
At first I tried keeping the last talon like part solid, but it won't fold so I decided to keep it free hanging so that I could fold it. The Vex motors were attached via nuts, hex screws and hot glue. The first Vex motor was also geared toward torque using Vex gears with a ratio of 36:60 or 1.6. The Vex motor ended up not being able to hold the weight at that setup and sagged so the ratio was changed to 12:60 or 5. At this setup it did not sag anymore but having the Vex 3-wire motor move under this setup caused it to click and stagger. This is not good behavior for a motor or a servo so it was removed and replaced with a stronger Vex 2-wire motor as I did not have any smaller count toothed gear or any bigger count toothed gear. It worked like a charm nonetheless! The second servo was able to lift its load well so it was not touched at all. The claw was then painted.
The controls for the set was the Parallax micro controller and a 7.2V source. The 3 wire Vex motor had to be controlled from the micro controller and the 2 wire Vex motor was be controlled by a 7.2V source and a Double Pole Double Throw switch. The schematic for the 2-wire Vex motor control is shown below.
The three wire motor was controlled from a the Parallax Board of Education micro controller. This micro controller also has a its own breadboard attached. I decided to use push buttons as it would be the easiest way for me control the 3 wire motor. The setup on the board is below:

The Board of Education micro controller is programmed in there own version of Basic: Basic Stamp. The code is below.
' {$STAMP BS2}
' {$PBASIC 2.5}
Main:
DO
IF (IN3 = 1) THEN
PULSOUT 13, 450 'counter cwise
PAUSE 50
ENDIF
IF (IN4 = 1) THEN 'clockwise
PULSOUT 13, 1010
PAUSE 50
ENDIF
IF (IN9 = 1) THEN 'counter cwise
PULSOUT 12, 500 '500 previous value
PAUSE 50
ENDI
IF (IN10 = 1) THEN 'clockwise
PULSOUT 12, 1010 '1010 previous value
PAUSE 50
ENDIF
LOOP
So to move forward, you press one push button. To go in reverse, you push the other.
After running the motors through their movements, they work well but do not have the solid strength and reliability of the pneumatics. If there are going to be troubles, then it will be with the claw.
part3
Wednesday, July 22, 2015
Crescent Rose Prototype Build Write Up Part 1
First step is to build the gun with pneumatics.
I went out and bought parts.and materials. List is below:
-Compressor (Viair 90C Air Compressor)
-Gauge (Nogren Item: 18-013-212)
-Teflon Tape(Buckeye Hydro)
-Solenoid(SMC SY3240-5LOZ valve, dbl sol, base mt (dc))
-Pneumatic Cylinder(Bimba 316D )
-Pneumatic Cylinder(Bimba 1710D)
-Rod Clevis(Bimba D2313)
-Rod Clevis(Bimba D2311)
-Storage Tank(Reservoir Cartridge 1/4" NPT Item: RC2.5X10-N02)
-Pneumatic fitting Union Tee(SMC KQ2T0700)
-Pneumatic fitting Male Connector(SMC KQ2H0734S)
-Pneumatic fitting Male Connector(SMC KQ2H0735S)
-Pneumatic Plate(SMC SY3000271T)
-Hollow Hex Plug(Parker 219P-4)
-Pneumatic Regulator(Nogren R07-200-RGKA )
-Plug Valve(Parker PV608-2)
-Hex Nipple(Parker 216P-2)
-Hex Union Tee(Parker 2203P-2)
-Pneumatic Tubing(TIUB07BU-33)
Since pneumatics can end up pretty heavy, I decided to use the lightest and strongest materials I could find and craft easily. I did not have access to shop tools so that left out plastics, metals, and some woods. So I took the next best thing, foam board and cardboard. I chose strong cardboard for the chassis for the gun and foam board as the covering. Sketches of the placement of parts and systems can be seen below.


I protruded one of the cylinders out because I needed a handle to hold Crescent Rose.
I found some strong curved cardboard in a dump that perfect served my needs for the frame for the pneumatics. I needed a hand saw to cut it. I then duct taped the pneumatic storage tank and one cylinder to the top curved cardboard piece and duct taped the second cylinder to the smaller curved cardboard piece. I then hot glued the two pieces together and further reinforced them with foam board while starting to build the frame.
Next I added the pneumatic components and put tubing in according to the sketches. The main components were the air exhaust valve, regulator, gauge, and solenoid. I also built the end piece of Crescent Rose out of foam board, craft foam and hot glue before painting that piece.

To control the pneumatic system, the solenoid has two buttons on it that you can press for manual release. You can also wire up the solenoid to a micro controller if you want the solenoid to be controlled from something like a controller. But since it is controlled through hands, a manual release was sufficient.
I went out and bought parts.and materials. List is below:
-Compressor (Viair 90C Air Compressor)
-Gauge (Nogren Item: 18-013-212)
-Teflon Tape(Buckeye Hydro)
-Solenoid(SMC SY3240-5LOZ valve, dbl sol, base mt (dc))
-Pneumatic Cylinder(Bimba 316D )
-Pneumatic Cylinder(Bimba 1710D)
-Rod Clevis(Bimba D2313)
-Rod Clevis(Bimba D2311)
-Storage Tank(Reservoir Cartridge 1/4" NPT Item: RC2.5X10-N02)
-Pneumatic fitting Union Tee(SMC KQ2T0700)
-Pneumatic fitting Male Connector(SMC KQ2H0734S)
-Pneumatic fitting Male Connector(SMC KQ2H0735S)
-Pneumatic Plate(SMC SY3000271T)
-Hollow Hex Plug(Parker 219P-4)
-Pneumatic Regulator(Nogren R07-200-RGKA )
-Plug Valve(Parker PV608-2)
-Hex Nipple(Parker 216P-2)
-Hex Union Tee(Parker 2203P-2)
-Pneumatic Tubing(TIUB07BU-33)
Since pneumatics can end up pretty heavy, I decided to use the lightest and strongest materials I could find and craft easily. I did not have access to shop tools so that left out plastics, metals, and some woods. So I took the next best thing, foam board and cardboard. I chose strong cardboard for the chassis for the gun and foam board as the covering. Sketches of the placement of parts and systems can be seen below.

I protruded one of the cylinders out because I needed a handle to hold Crescent Rose.
I found some strong curved cardboard in a dump that perfect served my needs for the frame for the pneumatics. I needed a hand saw to cut it. I then duct taped the pneumatic storage tank and one cylinder to the top curved cardboard piece and duct taped the second cylinder to the smaller curved cardboard piece. I then hot glued the two pieces together and further reinforced them with foam board while starting to build the frame.
Next I added the pneumatic components and put tubing in according to the sketches. The main components were the air exhaust valve, regulator, gauge, and solenoid. I also built the end piece of Crescent Rose out of foam board, craft foam and hot glue before painting that piece.
To control the pneumatic system, the solenoid has two buttons on it that you can press for manual release. You can also wire up the solenoid to a micro controller if you want the solenoid to be controlled from something like a controller. But since it is controlled through hands, a manual release was sufficient.
After that, I tested the system to see that it worked and had no leaks. It did not. I then proceeded to build the general shape of the gun more, cover the pneumatics and painted it before releasing a video:
It worked well and I was optimistic.
Tuesday, July 21, 2015
Crescent Rose Prebuild Write Up
Go right to part1
So I decided to build Crescent Rose from RWBY. Yeah this thing:

I wanted it to transform and retract back into a somewhat compact form. Specifically, I wanted it to extend out and be able to retract back to its compact form. After analyzing the movements I found the rod, and claw extension to be possible. The tiny horn-like mechanism on top of the claw I decided not to do, as my focus was the rod extension and the claw.
These were the options I ended up exploring.
Spring powered:
If I just wanted Crescent Rose to open up and not retract, I would have used mostly springs. Springs are good for one way movement but that means you have to fold your mechanism back up manually. With my goal of opening up and retracting, I couldn't go this way.
Gravity powered with weights:
I considered gravity and weights to move the pole extensions out and flip open the claw. It would also allow the prop to retract under specific movements. I had to scrap this one because the amount of precision needed to build the parts was not possible for me with what I had.
Hydraulics and Pneumatics:
These would be a great application to Crescent Rose for the extension, but they are costly, heavy and are good for only the gun extension. These can extend and retract if needed but are no good for the circular movement of the claw.
Servos and Motors:
These are very versatile and would definitely be good for Crescent Rose. They too are costly and the means to control servos requires extensive knowledge of a microcontroller and programming. Motors, the DC kind, are simpler but you have less control over them. However, these are great for Crescent Rose as they can achieve both linear and circular motion.
Transfer of motion and combination with springs and gravity:
This was another idea where I would build Crescent Rose to extend and retract based on the movements I put on the prop. This would achieve the gun extension and the rest of the claw out easily and achieve retraction well enough. This option, in combination with springs and weights with gravity would be the best option for Crescent Rose overall.
Analysis:
Pure springs had to be scrapped due to springs only being able to achieve extension and not retraction. Pure gravity and weights had to be scrapped due to the complexity of Crescent Rose. Only limits to hydraulics and pneumatics were cost, I know how to use them. Servos and motors are also costly but I know how to use them too. Only limits to the combination option was time.
Ultimately, I decided on Pneumatics,Servos and Motors to power Crescent Rose. I did not go with the combination option even though it may be my best was because I didn't want any human involvement with moving the prop besides switches and buttons and because I had the money for it. Plus automatic effects with buttons just looks cooler.
part1
So I decided to build Crescent Rose from RWBY. Yeah this thing:
I wanted it to transform and retract back into a somewhat compact form. Specifically, I wanted it to extend out and be able to retract back to its compact form. After analyzing the movements I found the rod, and claw extension to be possible. The tiny horn-like mechanism on top of the claw I decided not to do, as my focus was the rod extension and the claw.
These were the options I ended up exploring.
Spring powered:
If I just wanted Crescent Rose to open up and not retract, I would have used mostly springs. Springs are good for one way movement but that means you have to fold your mechanism back up manually. With my goal of opening up and retracting, I couldn't go this way.
Gravity powered with weights:
I considered gravity and weights to move the pole extensions out and flip open the claw. It would also allow the prop to retract under specific movements. I had to scrap this one because the amount of precision needed to build the parts was not possible for me with what I had.
Hydraulics and Pneumatics:
These would be a great application to Crescent Rose for the extension, but they are costly, heavy and are good for only the gun extension. These can extend and retract if needed but are no good for the circular movement of the claw.
Servos and Motors:
These are very versatile and would definitely be good for Crescent Rose. They too are costly and the means to control servos requires extensive knowledge of a microcontroller and programming. Motors, the DC kind, are simpler but you have less control over them. However, these are great for Crescent Rose as they can achieve both linear and circular motion.
Transfer of motion and combination with springs and gravity:
This was another idea where I would build Crescent Rose to extend and retract based on the movements I put on the prop. This would achieve the gun extension and the rest of the claw out easily and achieve retraction well enough. This option, in combination with springs and weights with gravity would be the best option for Crescent Rose overall.
Analysis:
Pure springs had to be scrapped due to springs only being able to achieve extension and not retraction. Pure gravity and weights had to be scrapped due to the complexity of Crescent Rose. Only limits to hydraulics and pneumatics were cost, I know how to use them. Servos and motors are also costly but I know how to use them too. Only limits to the combination option was time.
Ultimately, I decided on Pneumatics,Servos and Motors to power Crescent Rose. I did not go with the combination option even though it may be my best was because I didn't want any human involvement with moving the prop besides switches and buttons and because I had the money for it. Plus automatic effects with buttons just looks cooler.
part1
Subscribe to:
Posts (Atom)