Friday, June 24, 2016

Gambol Shroud Prototype Build Write Up Part 3: Painting and Finishing


Made some changes to the moving and sliding mechanisms. The whole steel bar was made shorter to reduce weight and to better attach one half of the blade to the mechanism. A spot was cut into the blade to attach the metal with hot glue.


Other pieces were cut out of foam board and had flaws filled in and sanded out.


The pieces were then painted and mounted to the mechanism. The outer gear was also made smaller due to the weight reduction. Same paints used for Myrtenaster were used here.


Side covers were then made from foam board and painted.


Then "metal box" covers were cut out of cardboard, painted, and attached.


The black side covers were then glued to the wood frame and the mechanism was attached. A toilet paper roll was cut and glued to the front.


A pattern was made to cover the sides. Craft foam was cut and hot glued to the side.


More craft foam details.


Paint time! Painted almost everything black. The plastic had to be sanded lightly so that the paint would stick.


Tried making a stencil for the logo. Failed horribly. Decided to hand draw the logo with white charcoal.


Logo was then colored in and covered with silver paint.


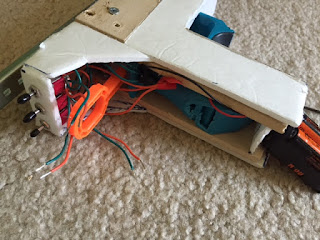
Wires were soldered to cut PWM cables for the motors to electrically connect to the switch.


Lastly, the orange Nerf priming hold was sanded and painted. White tape was used to cover and protect the area of most use in case paint would start to scrap off. Gun form.


Sword form


Demonstration video.


Gambol Shroud Prototype Build Write Up Part 2: Chassis and Nerf

Go right to part3

Got some wood,


Measure and cut it in half with a hacksaw.


F*ck

Both halves were cut it in half again.


Got a Nerf BowStrike.


It has pesky wings that pop-up when you prime to fire. Other than that, it fires well.


Since the gun will be covered, those wings need to go.


With the wood pieces, they were screwed together with some L-brackets to a third wood piece found in a scrap bin and holes were drilled on top to help attach the wood to the mechanism's steel frame.


The other two halves were attached to the wood frame with more L-brackets.


Looking at the bow strike, there were spots on the gun that stuck out when test fitting the gun to the wood frame. So they were cut off with a hack saw.

Like this spot.


Holes were also drilled into the handle of the wood. The BowStrike already had holes in it's handle. No need to drill through that. The holes were then filled with wooden dowels since the hold was permanent.


A pattern was then drafted so that it covered the dowel holes and met the same height as the top wooden part.


The pattern fit and so foam board was cut and glued to the wooden frame.


The bottom side was then covered by using form-fitting shapes made out of cardboard.


Poked a hole in the bottom so that the battery could be fitted there.


Got 3 DPDT (Double Pole Double Throw) switches and attached them to a piece of foamboard.


Wires were then soldered to these switches according to this diagram below.

image from: https://www.eleinmec.com/figures/012_01.gif


These were then glued to the back of the gun. The switches were then soldered to the same battery.


Squares were glued at the bottom of the gun to help hold the batteries.


A cover for the batteries was made out of craft foam.


Back was then covered with craft foam.


Liking the progress so far.

Left to do:
-Blade and sliding mechanisms
-Nerf shooting
-Covering
-Prettify

Part3